How to Install: Yale View
This article provides physical installation steps and Yale App set for the Yale View Doorbell Camera. A list of Frequently Asked Questions specific to the Yale View is available here .
Installation Best Practices
Charge the battery fully and set up in the Yale App before physical installation
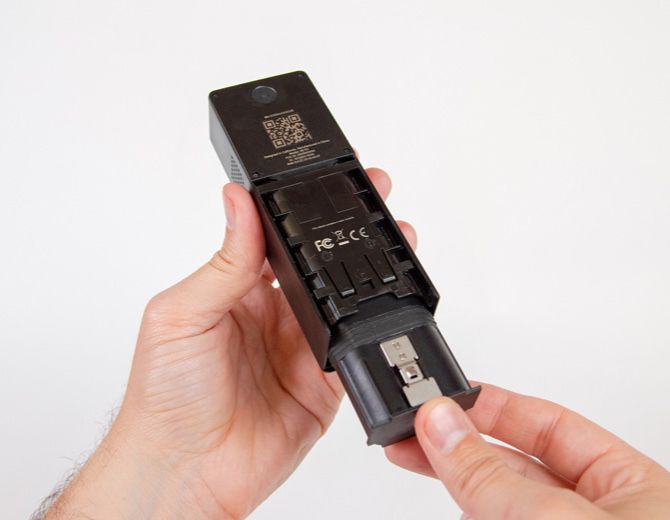
Remove the battery from your doorbell cam by pushing on the metal battery release tab on the back and sliding it out of the device. Once it’s out, remove and discard the sticker covering the battery contacts.
Plug the included USB cable into the battery, and the other end into an AC powered USB charger to fully charge the battery. The red light will turn green once the battery is fully charged.
Insert the battery back into your doorbell cam as shown, and download the Yale App to continue setup.

Download the Yale Access App
Before you get started, download the Yale Access App from either the Apple Store or Google Play depending on whether you use an iOS or Android phone:


Optimize Your Wireless Connection
Your Wi-Fi access point should be within 15-20ft of your door to ensure the best performance. Your Yale View will perform optimally if your Wi-Fi access point is on the same floor and as close to your Doorbell Cam as possible. If the Wi-Fi access point is too far from the device, the Doorbell Cam will not receive a strong enough signal. Multiple stories or brick/stone walls within your home may also contribute to signal interference.
Be Aware of Your Installation Surface
Surfaces such as brick, concrete, cement siding, and stucco require a masonry bit for drilling.
Also note that certain surface types such as brick and stucco can cause Wi-Fi interference. For example, stucco usually contains metal mesh wiring which can dramatically reduce the strength of your Wi-Fi signal.
Confirm Optimal Installation Location
The View Doorbell Cam can be mounted anywhere with a strong Wi-Fi signal and secure mounting surface. Before you install the device, ensure that the viewing area of the camera properly captures the area you wish to surveil, and that it is easy for guests to ring the doorbell. We recommend mounting at a height of 48” (120cm) for optimal access.
Installation
Follow the first 4 steps below to install the Yale View doorbell camera. Depending on the orientation of your front door, you will either need to follow the basic installation instructions, or the installation with wedge, for the remaining steps.
Step-by-step installation guide
Step 1. Position the camera where you want it on the wall
Recommended position is near your door and approximately 48 inches up from the ground.
It's a good idea to check your chosen position before mounting to the wall. This is done by viewing live video from the doorbell cam in the Yale App while testing mounting locations.
Make sure the doorbell camera captures the desired area before mounting. If needed, the included wedge can be placed between the wall and the doorbell cam to adjust the horizontal viewing angle.
Step 2. Mark the location
Using a pencil or other marking device, trace a line on the wall at the bottom of the doorbell to mark the location you’ve selected.
Step 3. Mark the holes
Align the mounting plate with your mark on the wall. Using a pencil or other marking device, mark the location of the two screw holes in the mounting plate.
Step 4. Drill the holes (if necessary)
Some surfaces, like wood and composite siding, may not require drilling holes first. You may be able to simply screw in the included screws. Refer to the chart below to determine what type of installation is appropriate for your wall.
Step 5. Select Installation Type: Flush Mount or Wedge Installation
Select Basic Installation for a flush mount installation or Installation with Wedge depending on your doorway setup.
Flush Mount installation
This page will guide you through the Flush Mount installation.
Installation with Wedge
This page will guide you through the installation with Wedge.