Troubleshooting your Yale Smart Outdoor Camera
Here you can find the answers about Troubleshooting your Yale Smart Outdoor Camera
FAQ
1. Check Wi-Fi Compatibility and Signal Strength
Important: Yale Smart Cameras only support 2.4 GHz Wi-Fi networks. They are not compatible with 5 GHz networks.
Steps to Troubleshoot:
- Verify your router’s frequency:
Ensure your router is broadcasting a 2.4 GHz signal. If you're using a dual-band router (2.4 GHz + 5 GHz), setup issues may occur if both bands share the same network name (SSID). - Split your Wi-Fi bands:
Rename the 2.4 GHz and 5 GHz networks with unique SSIDs (e.g., Home_2.4 and Home_5). Then, connect your phone to the 2.4 GHz network and retry the camera setup. - Confirm your internet connection is active:
A router may still broadcast a network even if the internet is down. Test by opening a website in your browser. - Check signal strength at the device location:
Use a free speed test app to measure Wi-Fi quality where the device is installed. If the signal is weak, try moving the device closer to the router during setup.
2. Grant App Permissions
Connection issues may occur if the Yale Home app does not have the necessary permissions.
To ensure successful set up:
- Accept all permission prompts during app installation and device setup.
- Required permissions typically include:
- Bluetooth – for device discovery
- Location access – for Wi-Fi setup and connectivity
If these permissions are denied, the app may not be able to detect or connect to your Yale device.
3. Ensure the Camera is Connected to Mains Power
If the Cameras battery level is below 20% then you may not be able to set it up. For this reason, we always recommend having the device connected to mains power during set up.
4. Special Characters in Wi-Fi Network Name (SSID)
Yale cameras running earlier firmware versions may fail to connect during setup if your Wi-Fi SSID (network name) or password contains special characters (e.g., commas, exclamation marks, symbols).
To successfully set up your camera and update its firmware, follow these steps:
Option 1: Temporarily Change Your Router’s SSID
- Log in to your router settings and change the SSID (network name) to something simple—avoid special characters.
- Connect and onboard the Yale camera to this simplified network.
- Allow the camera to complete its firmware update.
- Factory reset the camera.
- Revert your router’s SSID back to the original name (with special characters, if desired).
- Re-onboard the camera to your original network.
Option 2: Use an Alternative Network (e.g., Mobile Hotspot)
- Create a mobile hotspot on your phone with a simple SSID (no special characters).
- Onboard the camera to this hotspot.
- Wait for the firmware update to complete.
- Factory reset the camera.
- Connect the camera to your regular Wi-Fi network.
5. Camera Not Broadcasting Its SSID
When setting up your camera, make sure it is in onboarding mode—this is indicated by a flashing green light.
In this mode, the camera should broadcast its SSID. You can check this by opening your phone’s Wi-Fi settings and looking for the camera in the list of available networks.
Once you find the camera’s SSID, confirm that the serial number in the SSID matches the one printed on the product label.
If the serial numbers do not match, or you are unable to see the cameras SSID in the available network list, please contact Yale Customer Support for assistance.
6. Hardware Failure
If you've followed all the previous steps and still can't set up your camera, we recommend performing a hardware reset.
You can find step-by-step reset instructions in the Support Centre within your Yale Home app.
If set up still fails after a successful reset, please reach out to Yale Customer Support for further assistance.
1. Move the Camera Closer to the Router or Access Point
To ensure a strong and stable Wi-Fi connection, position your device as close as possible to your router or the nearest mesh node.
Reconnecting to the Optimal Access Point After Mounting
If you initially set up your device near one Access Point (AP) but later mount it in a different location with a closer AP, the device may still connect to the original AP. This can affect performance unless the device is reset.
To ensure your device connects to the strongest available Wi-Fi signal:
- Locate the reboot button on the device.
- Press and hold the reboot button for a second.
- The camera and its Wi-Fi module will restart.
- During the reboot, the device will scan for available Access Points and automatically connect to the one with the strongest signal (RSSI).
Note: If your camera is running firmware version v1.5.23 or later, you can restart it remotely using the Yale Home app (if the camera is online). This also triggers a re-scan for the strongest available Access Point.
This step is especially important in mesh or multi-AP environments to ensure optimal performance.
2. Check Your Yale Camera’s Current Wi-Fi Signal Strength
To check your Yale camera’s current Wi-Fi signal strength, follow these steps in the Yale Home App:
- Open the Yale Home App and select your camera.
- Tap on Settings.
- Go to Utilities.
- Select Wi-Fi Connection.
Once you're there, look for the RSSI (Received Signal Strength Indicator) value. Here's how to interpret it:
- Good Signal: ~ -40 to -55 dBm
- Poor Signal: ~ -65 dBm or lower
If your signal is poor, you might consider:
- Moving your router closer to the camera.
- Reducing physical obstructions (like walls or metal objects).
- Using a Wi-Fi extender or mesh system.
3. Reconnect Your Camera to a Closer Wi-Fi Access Point
If you've moved your camera after the initial setup, follow these steps to reconnect it to the strongest available Wi-Fi signal:
- Reboot the Camera
Press and hold the reboot button for a second. - Wait for Reboot
The camera will automatically restart and connect to the strongest available Wi-Fi network. - Check Signal Strength
Once the camera has rebooted, open the Yale Home app and check the camera’s signal strength under the device settings.
4. Try Fully Reinstalling The Camera
To reset your Smart Outdoor Camera, please follow the process below.
- Open the Yale Home app.
- Select your camera and then the settings icon.
- Scroll down to Utilities and select Remove Device.
Once the camera is removed, you will also need to manually reset the camera.
- Lift the grey rubber weather cover, on the underside of the camera and locate the button pictured below-
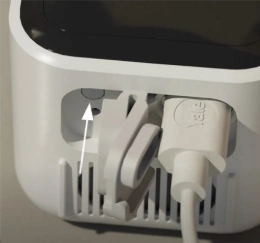
- Press and hold this button until you hear a beep (at least 12 seconds).
- Release the button; you will see a sequence of green and red LED flashes.
- Wait 60 seconds for the camera to fully reboot.
- The camera is now removed from your app and reset.
Once this has been completed, please select the top right "+" option from your Yale Home app dashboard, to setup the camera again.
You can reset your password in the app by choosing Forgot Password from the login screen, or alternatively- via the online account management portal.
Key Cause: High motion sensitivity in busy areas is the most common reason for rapid battery drain. Each motion event wakes the device from sleep mode to record, consuming battery.
Battery-Saving Tips: Adjusting the following device settings to match the installation environment can significantly extend battery life. You’ll find these options in the device settings within the Yale Home app.
-
Motion Detection Settings
- Avoid enabling “All Other Motion Detection” in high-traffic areas.
- Use “Human Detection” to reduce unnecessary triggers.
- Optional filters (with subscription): Pet, Package, and Vehicle Detection.
-
Motion Sensitivity
- Lower sensitivity to reduce detection range and limit frequent activations.
-
Detection Zone
- Exclude busy areas (e.g., roads, footpaths) using the zone editor to prevent unwanted triggers.
-
Clip Length
- Set shorter recording durations (10–60 seconds).
- Enable “End Recording When Motion Stops” to avoid extended recordings.
-
Motion Re-Trigger Time
- Add a delay (10–60 seconds) between recordings to reduce battery use during continuous motion.
Still Experiencing Issues? Consider continuous power options:
Video Doorbell power options:
- Existing Wiring: Use an 8–24VAC bell transformer.
- Yale AC Power Adapter: Plugs into a mains socket with 8m cable.
Rebooting your Yale Smart Outdoor Camera temporarily disconnects the internal battery, allowing the system to refresh and resolve minor issues.
You can reboot the device in two ways:
- Via the Yale Home App
- Directly on the Camera
1: Reboot via the Yale Home App
- Open the Yale Home app.
- From the dashboard, tap on your Camera.
- Tap the Settings icon in the top right corner.
- Scroll down to Utilities and select Restart Device.
Once restarted, the Camera will blink green, indicating a successful reboot.
2: Reboot via the Camera
- Locate the small button next to the power button under the rubber cover at the bottom of the camera.
- Use a security pin or needle to press this small button for one second, then release.
- The camera will reboot, and the LED will blink green, indicating a successful reboot.
A hardware reset restores your Yale Smart Outdoor Camera to factory settings. This process:
- Removes: Wi-Fi network settings and internally stored video clips.
- Retains: Registration to the current user’s Yale Home account and cloud-stored data.
Important: A hardware reset does not remove the device from your Yale Home account. Video clips stored in the cloud and the device’s registration remain intact. Removal from a Yale Home account is covered in Step 2.
Step 1: To Perform a Hardware Reset:
- Under the rubber cover on the underside of the camera, find the ON/OFF button.
- Press and hold this button for about 10 seconds until you hear a beep.
- Release the button; the camera LED will flash green and red in sequence.
- A steady blinking green LED indicates the camera has successfully reset and rebooted.
Important: After a reset, the camera can only be set up again if it’s removed from the original owner’s account - as per the next steps below. This prevents stolen devices from being re-registered.
Step 2: To Remove the Camera from Your Yale Home Account:
- Open the Yale Home app.
- From the dashboard, tap on your Camera.
- Tap the Settings icon (top right corner).
- Scroll down to Utilities and select Remove Device.
- Follow the on-screen prompts.
Final Notes:
- Resetting is useful when changing Wi-Fi networks or preparing the device for a new location.
- Always ensure the device is removed from your account before transferring ownership.
If you've recharged the battery in your Yale Smart Outdoor Camera and the device still doesn't power on, a reboot may be required. Normally, the Camera powers on automatically once the battery is charged. However, in some cases, a manual reboot is necessary.
To reboot your Camera:
- Locate the small button next to the power button under the rubber cover at the bottom of the camera.
- Use a security pin or needle to press this small button for one second, then release.
- The camera will reboot, and the LED will blink green, indicating a successful reboot.
This usually happens when the Power with Solar Panel option has not been enabled in the camera’s settings.
If this setting is off, the camera will operate in always‑on mode, which uses significantly more power. In this state, even a connected solar panel cannot keep the battery topped up, and the battery may drain completely within 24-48 hours.
To enable the setting:
- Open the Yale Home app.
- Select your Smart Outdoor Camera.
- Tap the Settings icon (top right).
- Go to Power with Solar Panel and switch it on.
Once enabled, the camera manages its power usage correctly and the solar panel can effectively maintain the battery.
If your Yale Smart Outdoor Camera enters Privacy Mode unexpectedly, it’s usually because the Arriving & Leaving feature is enabled. This feature uses your phone’s location to automatically turn Privacy Mode on when you arrive home and off when you leave.
You may have tested this feature previously and forgotten it was left on.
How to check or change this setting:
- Open the Yale Home app.
- Select your Camera.
- Tap the Settings icon (top right).
- Go to Arriving & Leaving under Device Settings.
- Adjust, enable, or disable the feature as needed.
Night‑time blurriness is usually caused by something reflecting the camera’s infrared (IR) light back into the lens. Common causes include:
Lens issues:
- Dust, spider webs, cobwebs
- Water droplets or condensation
- Oil smudges or fingerprints
These can scatter the IR light and create glare. Cleaning the lens regularly with a soft, dry cloth will normally fix this.
Installation issues:
If the camera is directed too close to a wall, soffit, gutter, or other surface, the IR LEDs may reflect off it and cause a hazy or overexposed image.
Try adjusting the mounting position or slightly redirecting the camera on its bracket to reduce reflections.
This can happen because many LED lights flicker at a frequency too fast for the human eye to notice, but visible to cameras. If the camera frame rate doesn’t match the LED flicker rate, you may see a strobing or flickering effect on the video.
Camera settings in the Yale Home app cannot remove this effect, but you can try:
- Relocating the camera to avoid direct exposure to the LED light source.
- Replacing the LEDs with flicker‑free models or using alternative lighting types.