Getting Started with the Yale View App

Here you can find the answers on Getting Started with the Yale View App.

FAQ

  •  

    Yale Indoor Wi-Fi  Camera – Full HD


    Yale Indoor Wi-Fi  Camera – Pan & Tilt


    Yale Front Door Wi-Fi  Camera – Light & Siren


    Yale Outdoor Pro Wi-Fi  Camera – 4MP


    Yale  4 or 2 Caemra CCTV Kit

    • SV-4C-4ABFX-2 V2 - 4 camera Kit 1080 -  4ch, DVR (1TB)

    • SV-4C-2ABFX-2 V2 - 2 camera Kit 1080 - 4ch, DVR (1TB)


    Yale Smart Motion 4 or 2 Camera CCTV Kit

    • 4 Camera Kit - YSV-4CSMD-8CK 

    • 2 Camera Kit  - YSV-2CSMD-4CK

     
    • Yale Floodlight Camera 


  • The Yale View app is compatible with iOS and Android mobile operating systems.

    The app is available on the Apple App Store or Google Play.

    Download the Yale Alarm app from the links below.

    1. Open the Yale View app and select Register.
    2. On the next page, the country field will have a pre-defined country set based on your mobile device's regional settings. If you need to change your country, tap on the country name tab and select your country from the drop-down list.
    3. On the next page enter your email address and set a password, when the password criteria is met, you may then press the verification code tab to proceed to the next step.
    4. After pressing the verification code tab, a verification code is sent to your email address and is valid for 15 minutes, enter the verification code and press OK. 
    5. You will see sign-up successful appear and then be automatically logged into the Yale View app.


  • When installing an IP camera, it’s important to ensure that the Wi-Fi network at the location is strong enough to support it.

    The Yale View app has a built in Wi-Fi tool to check the signal strength.

    To conduct a Wi-Fi signal test, go to Tool Wi-Fi Detection Tool > place your phone in the location to be tested and press Wi-Fi Detection.

    The scan will take approximately 60 seconds and the results of the Wi-Fi signal will be displayed.


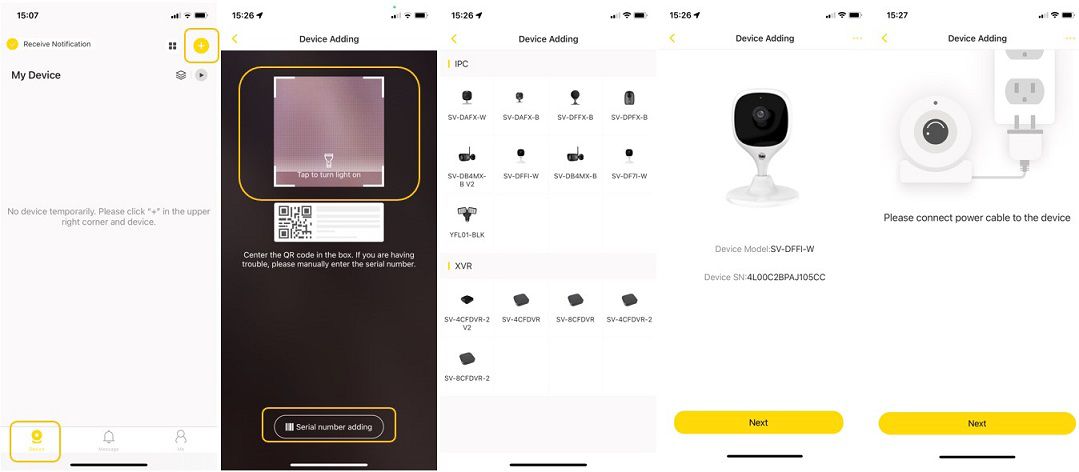
  • To set up and onboard a Camera to your Yale View app, select the device icon followed by the + icon

    Next scan the QR code or select serial number adding, to manually enter the camera serial number. 

    If the Yale View app doesn’t recognize the camera model from the QR/Serial number, you will be asked to select your camera model from the in-app list.

    Select your device and press next, you will then be instructed to power on your camera. 

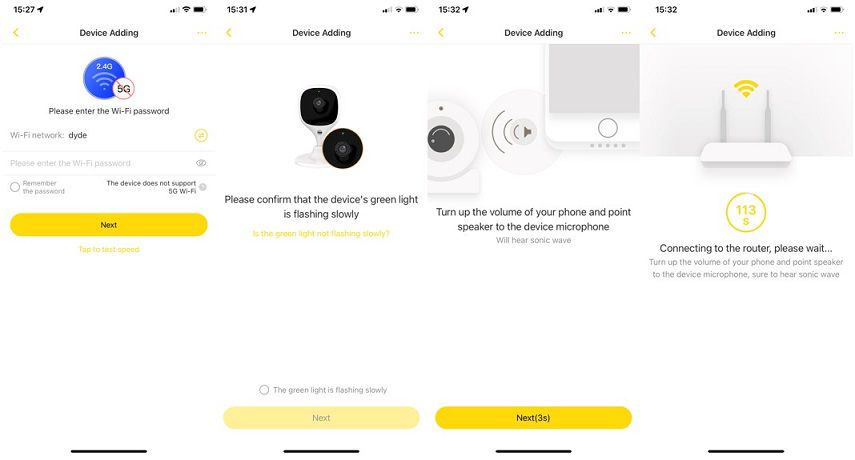
    Select your WiFi network and enter your network password.

    Confirm that the green light is flashing on your camera and select next.

    Turn up the volume on your mobile device and point your speaker to your camera microphone, during this process, a timer will begin to countdown while the Yale View app connects the camera to the router. 

    Once the camera is connected to your WiFi network, as an added layer of security, you need to set a password for your camera.

    You can then set a name for your camera for example front door and select done. 

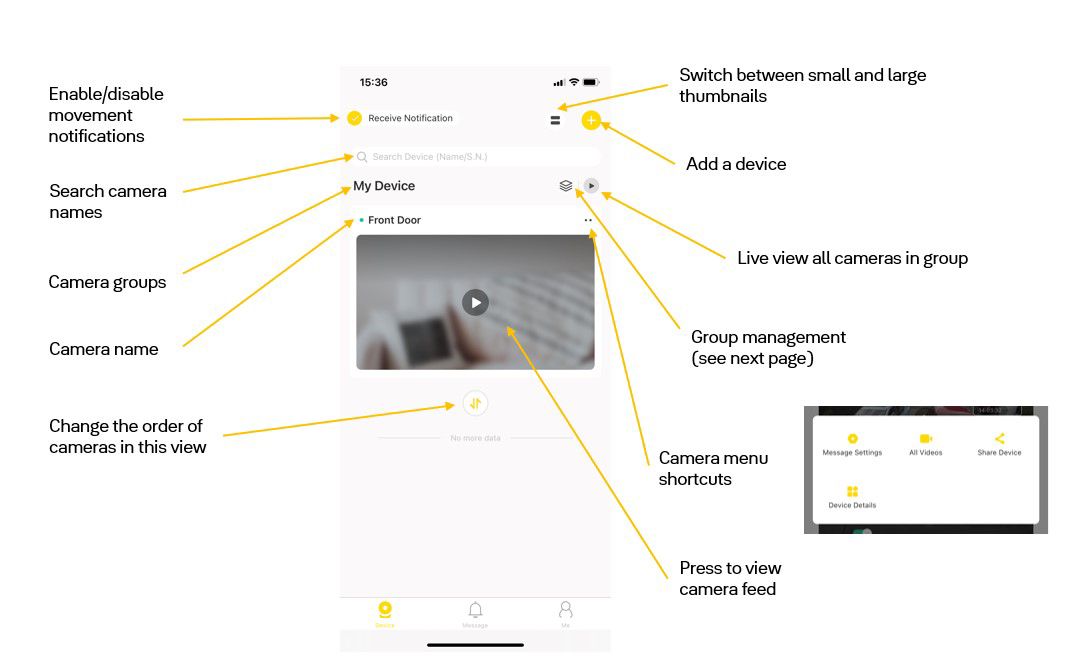
    Congratulations, your camera is onboarded to the Yale View app and will appear in the My Device list. 


  • When powering on your Yale CCTV DVR for the first time, the DVR runs through the setup wizard, as part of the setup you have the opportunity to scan the QR code to link your DVR to the Yale View App.

    If you skip this option during the setup wizard, you can access this option from the DVR menu at a later date, Go to “Network” menu option in the main menu setting then select the P2P menu option. The QR Code will be displayed, scan the device QR code with your View App and follow the in-app flow.


  •  

If you need additional support

You can get a more visual help related to our products at our download center and in our library for support videos. 

It looks like you’re browsing from the U.S. or Canada

The yalehome.com/us site has migrated to shopyalehome.com for U.S. and Canada customers and partners. Do you want to stay on this page or go to the U.S./Canada site instead?

Go to the U.S./Canada siteStay on this page